Software Suite must also be installed already with the initial configuration completed. If this is not the case, please see the "Technical Installation Guide" or consult your system administrator.
Information You'll Need
- HubSpot CRM API Key (Details to obtain this can be found below)
Configuration
1. Adding the integration
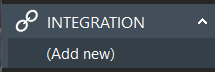
Right-click the Software Suite icon in the tray menu of your PC, and then left-click the "Configuration" option from the menu that pops up. This will open the "Configuration" screen. Under the heading "Integrations", click the "Add new" button.
From the drop-down that appears, choose "HubSpot", and then click the "Set" button.
2. Setting up the integration
The integration configuration will now appear. Here, you can rename the integration in the top text box, if you would like. It is called "HubSpot" by default.
Depending on the version of integration you are using, you may see "API Key" as the authentication method. This is now deprecated, but you can still read about it in Appendices A3.
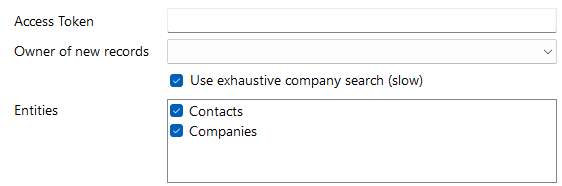
In the "Access Token" box, enter your HubSpot access token.
To obtain your access token:
1. Log in to your HubSpot front end and select the settings cog at the top right of the screen.
2. Click the heading "Integrations" on the left, and then "Private Apps".
3. Press "Create a private app".
4. On the page that appears, you can change the name of your private app if you want.
5. Along the top, press "Scopes".
6. Tick the boxes to match the below. For information on what each of these scopes do, please see Appendices A2.

7. Click the "Create App" button, and then "Continue Creating".
8. When you get a message saying "Your private app was created", click "Show token" and then copy your access token.
9. Paste this into your client integration configuration.
The "Owner of new records" option is used to define which user the call logs and new records will be assigned to. Choose the appropriate user from the drop down.
The "Entities" box shows all the entities that the integration can look up. Select the ones you require.
Press the "Save" button on the Integration Configuration.
3. Caching the integration
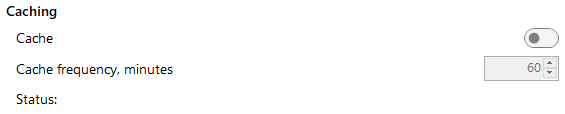
This add-in has the ability to cache the contact data (cached mode).
To enable caching, select the tick box next to "Cache". You can set how often you want the integration to cache in the "Cache frequency, minutes" box.
4. Activities
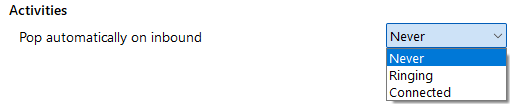
This integration can be individually configured to automatically pop matching contact entries on incoming calls, either during ringing (as soon as the call is presented) or when connected (after answering the call).
This option allows you to attach details of the call with the associated contact automatically.
Under the heading "Activities", select the box "Create activity on call end" to automatically log the call activity to the contact in HubSpot when the phone call has terminated.
5. Testing
You can test whether the integration works successfully through the integration configuration. Please note: For some integrations, the below testing features will not work fully. For a definite test of an integration, use the client address book or check the client logs.

Press the "Check" button next to "Check connection" to make sure the credentials you have entered above are correct.
You can search for a contact to further make sure the integration worked correctly by pressing the "Test" button next to "Test search". Enter a phone number, and press search. If the test does not work, go to the "Log" page of configuration and see if there are any errors in the log.
Appendices
A1) Terms and Conditions
This Addin Guide page will assist you through configuration and basic use of the Software Suite HubSpot Add-in. It is expected that you are already familiar with the Address Book, Call History and Preview window, and the basic concepts of integration and screen popping using the Add-ins. See the "User Guide" for these topics.
Please note that the above addin or features may not be included in your version of the Software Suite. Contact your telephone system provider for further information.
A2) Scope definitions
Below you will find the following scopes required for our integration to work, along with a brief description to what they do.
| Scope | REASON |
| crm.objects.companies (write) | Creating new companies and call logging. |
| crm.objects.companies (read) | Search/cache companies. |
| crm.objects.contacts (write) | Creating new contacts and call logging. |
| crm.objects.contacts (read) | Search/cache contacts. |
| crm.objects.owners (read) | For configuring the owner of records |
A3) Old Method - API Key Authentication
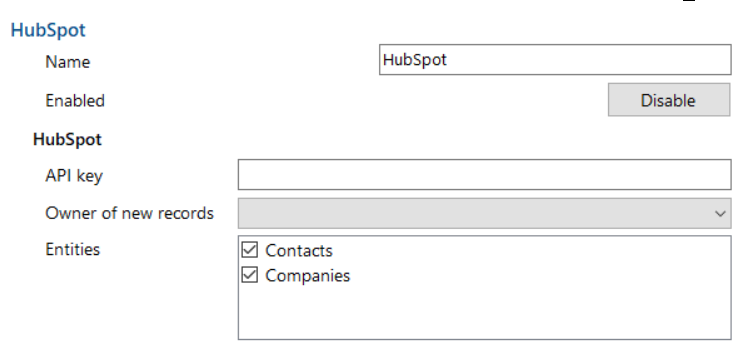
In the "API Key" box, enter your HubSpot API Key.
To obtain your API Key, log in to your HubSpot front end and select the settings cog at the top right of the screen. Click the heading "Integrations" on the left, and then "API Key".

Click the "Create Key" button, and make note of the API Key generated.
Paste this into your client integration configuration.
The "Owner of new records" option is used to define which user the call logs and new records will be assigned to. Choose the appropriate user from the drop down.
Was this article helpful?
That’s Great!
Thank you for your feedback
Sorry! We couldn't be helpful
Thank you for your feedback
Feedback sent
We appreciate your effort and will try to fix the article